Sunday, February 26, 2023

I've Gone And Done It Again. . .

That's right - I started a new room, even when I was so close to being done with the Trunk Room! The room that I started to renovate this time is the room I formerly called Becky's room. It was the first room I ever wallpapered way back when I began miniature making, and I always had a plan to redo it, but (perhaps out of fear) hadn't touched anything in it.
Unfortunately, the only photo of it I could find has terrible lighting, but it gives you a general idea. I have been making plans for a few weeks for what the room will be, and I thought I would share them with you. When I was around eight or nine, I was obsessed with the Famous Five series by Enid Blyton, and I was always imagining myself as one of the characters. My favorite of the Famous Five series was Five Go To Smuggler's Top, partly because of the description of the castle that the Famous Five was staying at. I used to imagine I'd have an enourmous dollhouse that was exactly like the castle in the book, so to satisfy these childhood dreams, I decided that I'd base this room after the castle in the Famous Five series. T he occupant of the room will be called Marybelle (who is one of the characters the Famous Five meets in the book), who is around ten years old. To start with the renovation, I pulled out all the wallpaper, leaving bare white walls. It was an easier job than I expected because I hadn't applied enough glue to the walls.
Now, for the 'before' images.
The East Wall (you'll have to excuse the pink tint to the photograph, my camera doesn't photograph white very well).
The South Wall (the red on the white walls is not because of the camera, but is just some red marker (?) that stained the roombox.
The North Wall.
The floor.
And lastly, the ceiling. I am very excited to see where this project takes me, and I hope you'll enjoy following along too!

Saturday, February 11, 2023

The Trunk Room Nears Its Finishing Touches

I was commemorating the completion of the wooden floor in the Trunk Room by taking a lot of photos with dramatic lighting for my own amusement when I decided that instead of stalling, it was best to work on the door jamb.
The bottom of the door opening looked like this before I added the door jamb. Because the door opening was a bit higher than the floor, it would have to be part of a step I was planning on building soon.
I added the door jambs inside, and here is a photo of that (they are not glued in yet).
The doorway was very crooked and I didn't particulary want to sand it down, so I glued in the door jamb and just put pieces of wood underneath the pieces of the door jamb to straighten them.
In this image you can really see how painfully crooked the door jamb was before I straightened it.
After I had finished the door jamb and had added the door trim around it, I had to add the step. The above photo is what the door looked like without the step in place (I also like how you can see the dollhouse through the door opening).
I added a small piece of trim right above where the tiny step would be.
Above is the finished step. It is very small, for it is just meant to ensure you do not have to take a very large step down when entering the trunk room. Oh! And do you remember the gap between the wainscotting and the floorboards I was having trouble with in the post before?
Well, I finally fixed it!
And also, thank you for staying with me till the end of this long and most likely very boring posts (door jambs only go so far to stir up people's excitements, I know 😀). In my next post I will be onto decorating the trunk room! Hooray! Thank you for reading!

Saturday, February 4, 2023

Work Continues In The Trunk Room

As work has been progressing very slowly on Lockwood Manor, my goal for this month of February was to complete at least one room. Because I was almost finished with the Trunk Room, I decided it was a good place to start and laid the floor.
The floor before.
Nearly finished!
And done. Well, it looked fine - except for one thing.
There was a very small gap between the wainscotting and the floorboards. It was too small to make another floorboard to fit, so I had to brainstorm another solution. I could put a piece of grating in that corner, but I didn't have anything that small. I put that on hold for the moment to work on a door.
I drew a rough outline of the door, then cut it out.
It is too thin to be an actual door, so I will add some strip wood to the sides of it to make panelling, which should help some.
This is what the door looks like inside the Trunk Room.
While I have put the Trunk Room on hold for the time being until I figure out how to fix the floorboards, I have a few projects that I'm working on that I will post about soon, so stay tuned!
The view into the North Attic Bedroom from the door, which is what it would look like if Lockwood Manor was a real house (rather unrealistic head proportions, I know). Have a good weekend!

Monday, January 16, 2023

The Trouble With the Trunk Room

Hello! I'm sorry I haven't posted in a while, time just seems to slip away from me in these early winter months. I have however managed to get some work done in Lockwood Manor, including fixing up a room. You see, the Trunk Room in Lockwood Manor had originally had glass tiles glued to the bottom of the room box, which made the wallpaper, and the layer of thick orange cardstock beneath it (it was glued on about the same time as the glass tiles) bump out considerably.
Above are the glass tiles in question, along with the cardstock. My original plan was just to lift up the wallpaper a bit at the bottom, which would have been easy to do as it had never been glued down very well. Unfortunately, while it appeared that Plan A would work, the cardstock that was glued to the wall on the right hand side was thick enough that it was causing the wallpaper to bulge out, and would make the wainscotting that I was planning on gluing in pop out.
While it is not a very good image because such a thing is difficult to capture on camera, you can see the trunk room before I started to work on it. What follows next is a bit like one of those: "Why You Should Be Satisfied With Your First Version of the Room And Never Try To Fix The Things You Did Sloppily In It" stories, for everything that could go wrong seemed to.
On the left hand side of the room, you can see that on the bottom left, the tiles cause the wallpaper at the bottom to bulge out. The door has a rather large step down, but the wallpaper under the door frame at least shows you what is should be like without tiles.
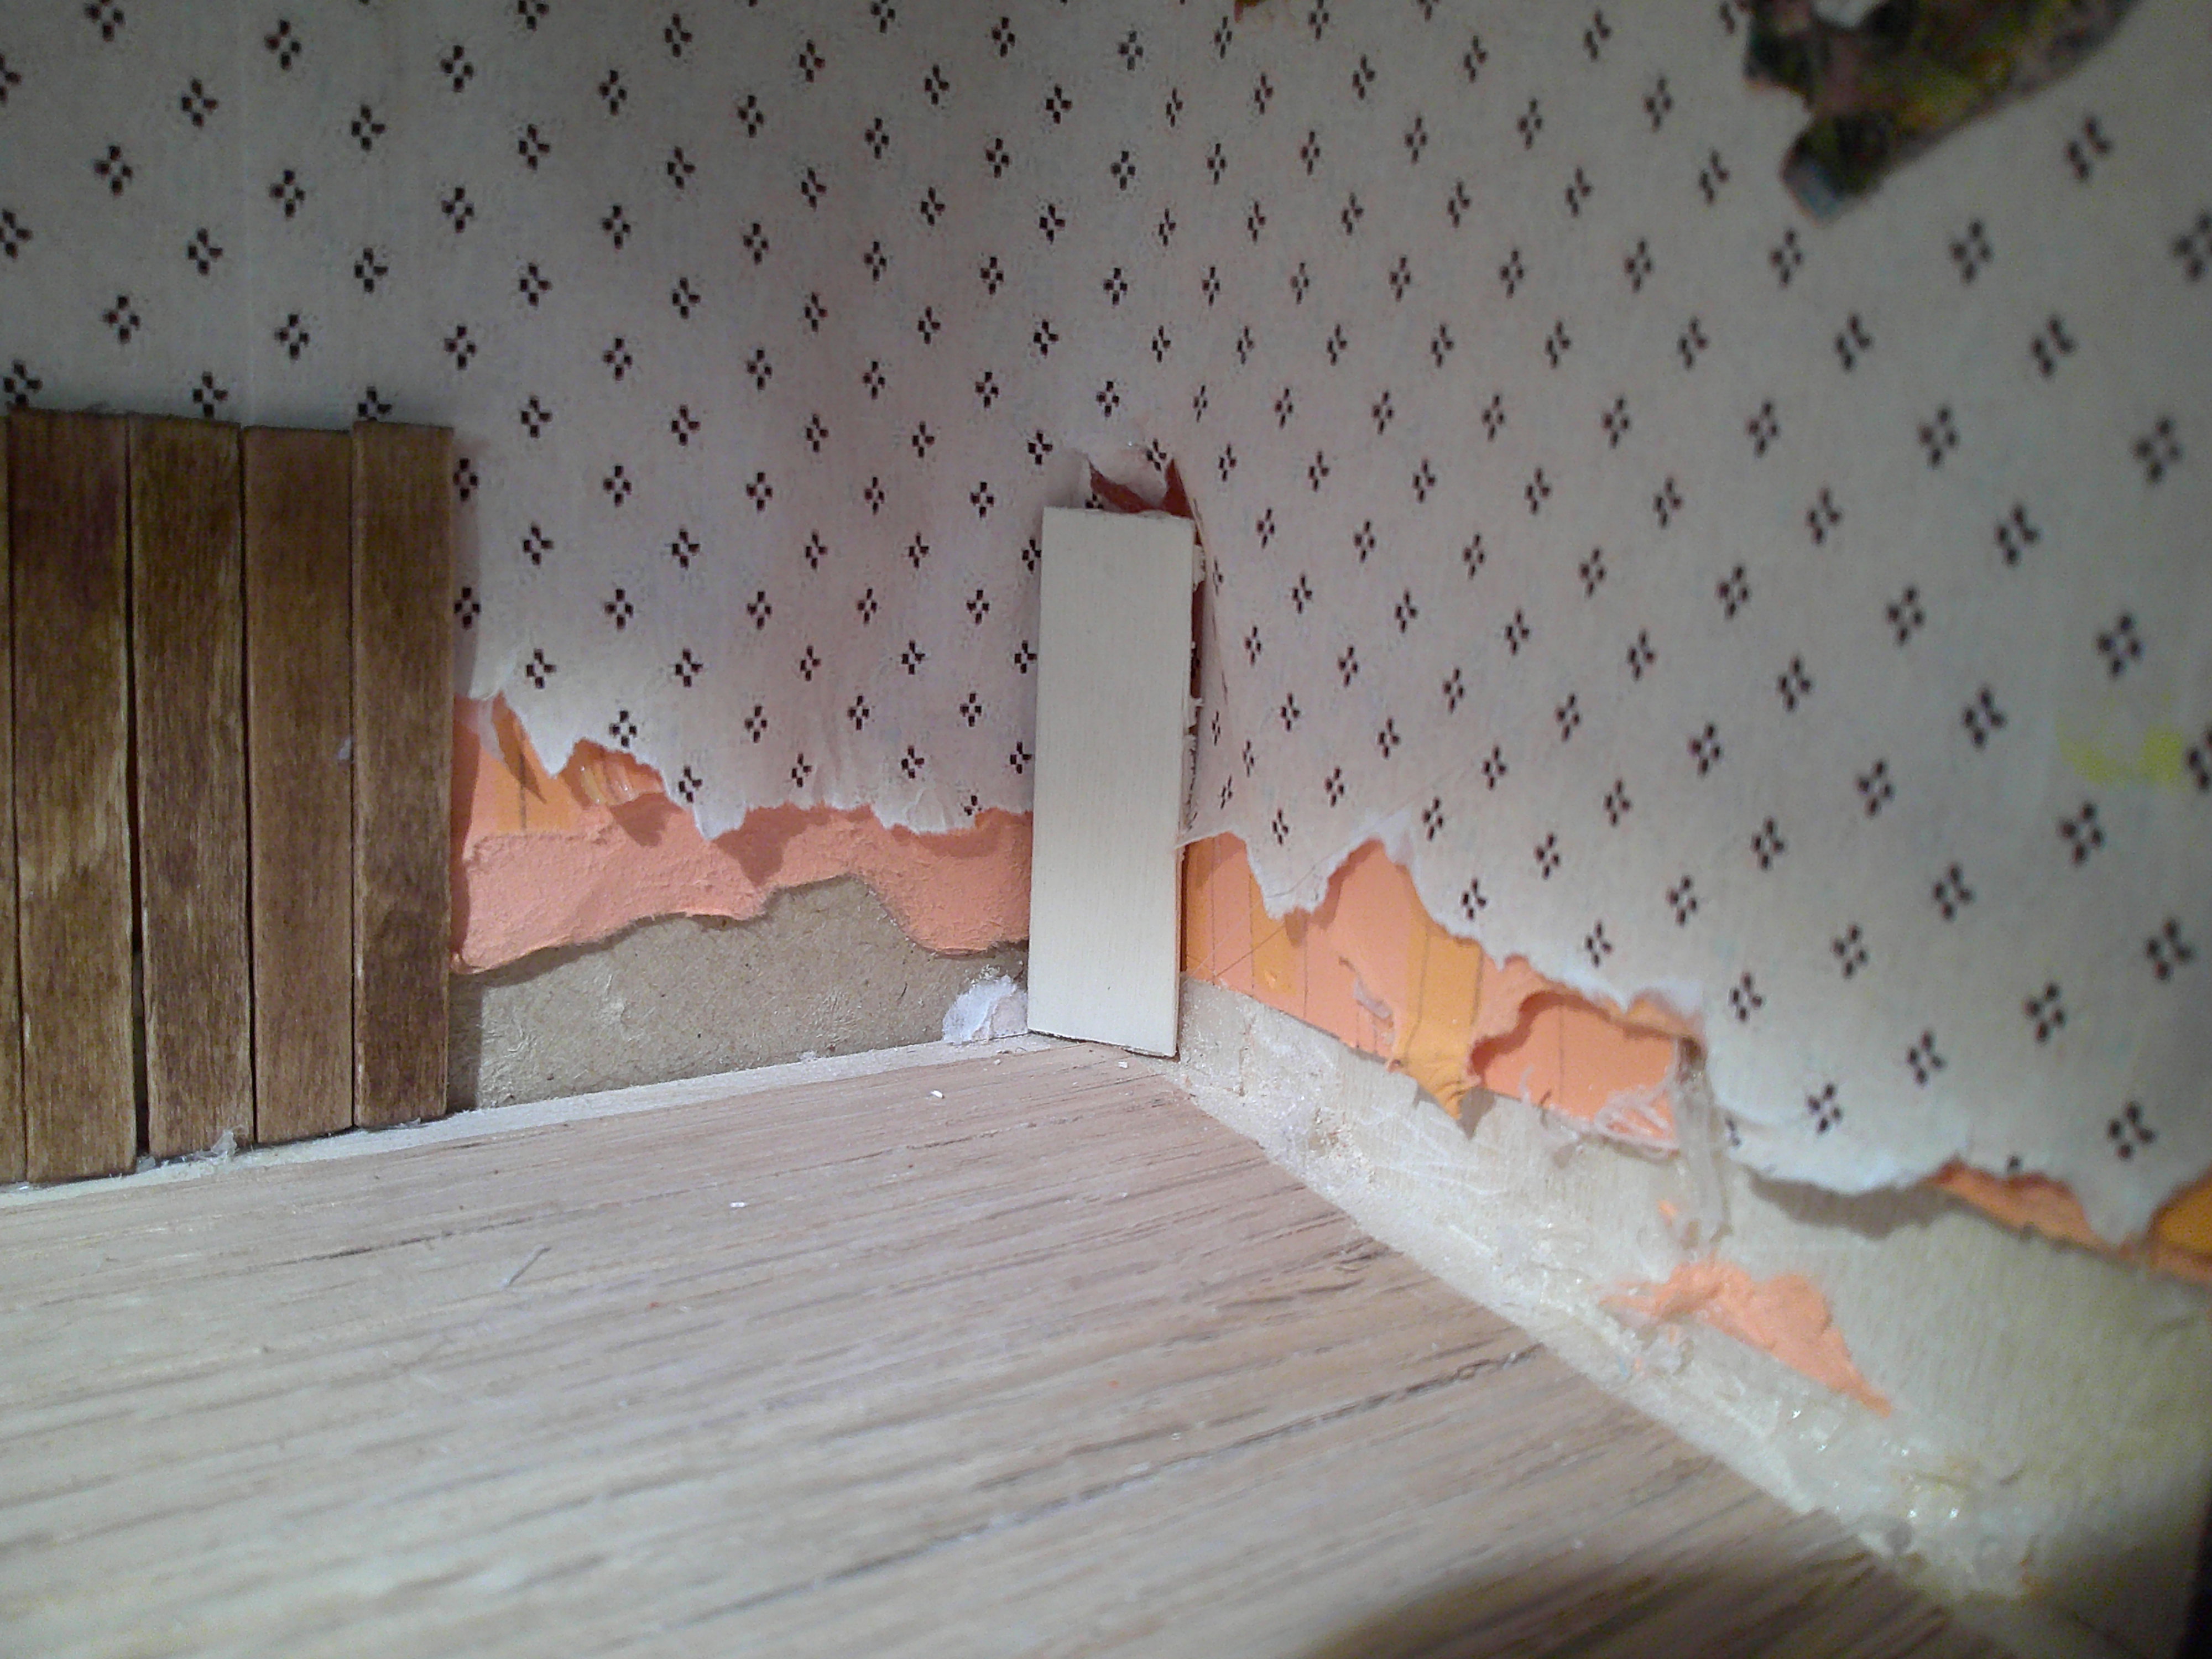
After about an hour of work, I managed to take off the tiles at the bottom of the wall and rip off part of the wallpaper so I could glue on some wainscotting, which I thought would cover up all the mistakes at the bottom of the roombox. You can see the orange cardstock in the image, but I didn't want to rip it off in that corner because it was glued down flat and wasn't causing the wallpaper on top of it any problems. After this, images become sparse, for it was very difficult to take off any of the tiles, and was even more difficult to do so while holding a camera.
This image that looks like it was taken at midnight (I assure you that it was not), shows what the room (a corner of it, anyway) looked like after I ripped off most of the tiles. Well, hurray! All the tiles were gone, and I could start gluing in the wainscotting and completely forget all the troubles that I had had with the Trunk Room. Well. . . no.
I'm pretty certain that you cannot see it in this image, but the walpapery was glued in at a curve, with no wall behind it, and was so flimsy that if you accidentally knocked the wallpaper in that corner, it would break in half. It wasn't properly glued in at all, and to fix that, I had to tear it all off.
To address this issue, I had to rip off all of the wallpaper on the right hand side. At the left, you can see the start of my wainscotting. Then, to add interest to the otherwise rectangular room, I glued in a wall at a slight angle on the right.
Originally, I had wanted to glue just a tiny piece of wood at the corner, and then I wouldn't have to rip off all of the wallpaper, but the curve was still noticeable.
I stained the wainscotting, and began to glue it in.
Once I glued all of the wainscotting in, the floor decided to be a problem. I had put down flooring that was Peel-And-Stick, and it was coming up in place. Instead, I wanted a nice wooden floor. But, I'm afraid I've made this post too long already, so I will be back soon, hopefully with the Trunk Room finished (famous last words)! For now, stay well!
Snow (made out of paper) adorns the Servant's Entrance at the back of Lockwood Manor

Monday, January 2, 2023

Onwards With Mr. Messenger's Study

I began to work on Mr. Messenger's Study today.
I wanted the ceiling to be something more interesting than the usual white, so I chose to have it gold.
I didn't have any wallpaper glue, and I was eager to get started anyway, so I decided to use Tacky Glue. I was a bit nervous, as I wasn't sure what it would be like to glue down wallpaper (or in this case, ceiling paper) with it.
I constructed the fireplace wall using sturdy cardboard and pieces of wood as braces.
The fireplace I made out of wood, which I stained a nice brown. I had a bag with a Safari theme, and I decided that Mr. Messenger was a well-traveled gentleman, so I would be using lots of images from the bag as paintings on his walls.
There was a nice border on the bottom of the wall (please excuse the glare), and I thought it would make a nice wallpaper border.
The wallpaper was one that I found on cider12's website (cider12.com). It was exactly how I had envisioned the wallpaper to look, which was a lucky break for me, as normally I can never find wallpaper that matches the one I imagine.
Here is a mock-up of how Mr. Messenger's study will look once the wallpaper and the fireplace is installed. I can't wait to see how the room looks when it is completed! I hope you had a wonderful New Year!

Friday, December 30, 2022

Contemplating the Library

If I wanted to be very outrageous, I could have a Formal Library and then a Informal Library. Considering that at this point, the size and ambition of Lockwood Manor is pretty outrageous, I think it's a pretty good idea. Also, there is a good reason to have two libraries (even if I have to make around a thousand mini-books), the formal one would be built to impress, and the informal one would be built to, well, read in. I spend a lot of my time looking at pictures of old houses, and quite often it is the photos of the libraries that I am drawn to. The large ones are extremely impressive, and the smaller ones are very cosy. I wanted to have both an impressive and a cosy library in Lockwood Manor, but I thought that it would be better not to have one library that was both impressive and cosy, but rather two libraries.
The above room may become the Informal Library, or something else. It certainly looks like it is full of potential! Now, I shall have to go to search for some inspiration. . . (You must excuse the extremely short post, as I found this hidden in my drafts the other day, and thought that it was a good idea to finish it up and post it. I haven't made any progress on the libraries yet, but hopefully that will change very soon!) In the meantime, happiest new year! I hope 2023 is a wonderful year for you and yours!

Friday, December 23, 2022

Fixing Things Up For Christmas

I've got some cheerful music playing in the background, a few snow flurries are falling from the sky, the fireplace is lit, and I thought it was about time to fix a few things up around the dollhouse so it could at least look slightly more presentable for the holidays.
Because of all the gusty winds we've been having at Lockwood Manor, a slate tile fell off of the roof. As that is the side of the dollhouse you first see, I had to fix it first.
Much better! Next came the subject of redoing the ceiling in the servant's room, which I had rather sloppily painted a year ago as a temporary fix.
I started to add wood panelling to the ceiling. I was worried that for some reason it would end up looking like a floor on a ceiling, so I decided to lay the pieces of wood vertically instead of horizontally.
The work progressed quickly, even though it was rather tedious, and pretty soon I finished it.
I still need to add trim on the sides of the boxes (you can see that I've layed the trim for the bottom), but I have to wait until I've finished the attic room above it. If anybody has any ideas of what the attic room could be, I'd love if you could write it into the comments.
I also added little clothes into the drawers!
For some reason I really like this image. By the way, the poster for 'Jazz Wear' came from a sticker book about 1920s fashion. I figured it was appropriate for Lockwood Manor, so I hung it up.
Next, I endlessly glued down planks of wood to make the floor in the North Attic Bedroom. It was enjoyable once I got into the flow of it. I'm not sure if you can see, but the nail dots that I've added to the boards are made with a pencil tip.
I made a door for the attic, and installed it. Although it took me a few times to get the hinges right, I finally was able to and the door actually swings!
I also installed trim in Anthea's Room. The roomboxes aren't really finished in my opinion until you add trim to hide the messy edges.
Thus concludes fixing up the dollhouse for Christmas! Happy holidays, everybody!

A Warm Welcome

Originally, I was going to put the back stairs on the left side of the dollhouse. However, after the demolition of the original back stairs ...