Showing posts with label Servant's Entrance. Show all posts

Monday, January 16, 2023

The Trouble With the Trunk Room

Hello! I'm sorry I haven't posted in a while, time just seems to slip away from me in these early winter months. I have however managed to get some work done in Lockwood Manor, including fixing up a room. You see, the Trunk Room in Lockwood Manor had originally had glass tiles glued to the bottom of the room box, which made the wallpaper, and the layer of thick orange cardstock beneath it (it was glued on about the same time as the glass tiles) bump out considerably.
Above are the glass tiles in question, along with the cardstock. My original plan was just to lift up the wallpaper a bit at the bottom, which would have been easy to do as it had never been glued down very well. Unfortunately, while it appeared that Plan A would work, the cardstock that was glued to the wall on the right hand side was thick enough that it was causing the wallpaper to bulge out, and would make the wainscotting that I was planning on gluing in pop out.
While it is not a very good image because such a thing is difficult to capture on camera, you can see the trunk room before I started to work on it. What follows next is a bit like one of those: "Why You Should Be Satisfied With Your First Version of the Room And Never Try To Fix The Things You Did Sloppily In It" stories, for everything that could go wrong seemed to.
On the left hand side of the room, you can see that on the bottom left, the tiles cause the wallpaper at the bottom to bulge out. The door has a rather large step down, but the wallpaper under the door frame at least shows you what is should be like without tiles.
After about an hour of work, I managed to take off the tiles at the bottom of the wall and rip off part of the wallpaper so I could glue on some wainscotting, which I thought would cover up all the mistakes at the bottom of the roombox. You can see the orange cardstock in the image, but I didn't want to rip it off in that corner because it was glued down flat and wasn't causing the wallpaper on top of it any problems. After this, images become sparse, for it was very difficult to take off any of the tiles, and was even more difficult to do so while holding a camera.
This image that looks like it was taken at midnight (I assure you that it was not), shows what the room (a corner of it, anyway) looked like after I ripped off most of the tiles. Well, hurray! All the tiles were gone, and I could start gluing in the wainscotting and completely forget all the troubles that I had had with the Trunk Room. Well. . . no.
I'm pretty certain that you cannot see it in this image, but the walpapery was glued in at a curve, with no wall behind it, and was so flimsy that if you accidentally knocked the wallpaper in that corner, it would break in half. It wasn't properly glued in at all, and to fix that, I had to tear it all off.
To address this issue, I had to rip off all of the wallpaper on the right hand side. At the left, you can see the start of my wainscotting. Then, to add interest to the otherwise rectangular room, I glued in a wall at a slight angle on the right.
Originally, I had wanted to glue just a tiny piece of wood at the corner, and then I wouldn't have to rip off all of the wallpaper, but the curve was still noticeable.
I stained the wainscotting, and began to glue it in.
Once I glued all of the wainscotting in, the floor decided to be a problem. I had put down flooring that was Peel-And-Stick, and it was coming up in place. Instead, I wanted a nice wooden floor. But, I'm afraid I've made this post too long already, so I will be back soon, hopefully with the Trunk Room finished (famous last words)! For now, stay well!
Snow (made out of paper) adorns the Servant's Entrance at the back of Lockwood Manor

Friday, December 23, 2022

Fixing Things Up For Christmas

I've got some cheerful music playing in the background, a few snow flurries are falling from the sky, the fireplace is lit, and I thought it was about time to fix a few things up around the dollhouse so it could at least look slightly more presentable for the holidays.
Because of all the gusty winds we've been having at Lockwood Manor, a slate tile fell off of the roof. As that is the side of the dollhouse you first see, I had to fix it first.
Much better! Next came the subject of redoing the ceiling in the servant's room, which I had rather sloppily painted a year ago as a temporary fix.
I started to add wood panelling to the ceiling. I was worried that for some reason it would end up looking like a floor on a ceiling, so I decided to lay the pieces of wood vertically instead of horizontally.
The work progressed quickly, even though it was rather tedious, and pretty soon I finished it.
I still need to add trim on the sides of the boxes (you can see that I've layed the trim for the bottom), but I have to wait until I've finished the attic room above it. If anybody has any ideas of what the attic room could be, I'd love if you could write it into the comments.
I also added little clothes into the drawers!
For some reason I really like this image. By the way, the poster for 'Jazz Wear' came from a sticker book about 1920s fashion. I figured it was appropriate for Lockwood Manor, so I hung it up.
Next, I endlessly glued down planks of wood to make the floor in the North Attic Bedroom. It was enjoyable once I got into the flow of it. I'm not sure if you can see, but the nail dots that I've added to the boards are made with a pencil tip.
I made a door for the attic, and installed it. Although it took me a few times to get the hinges right, I finally was able to and the door actually swings!
I also installed trim in Anthea's Room. The roomboxes aren't really finished in my opinion until you add trim to hide the messy edges.
Thus concludes fixing up the dollhouse for Christmas! Happy holidays, everybody!

Monday, October 31, 2022

Happy Halloween!

I should be back with more posts and updates soon! But in the meantime, Happy Halloween!

Saturday, October 1, 2022

A Big Step (Quite Literally)

First of all, I apologize in advance: the reason you see bold yellow dates at the bottom of the photos is becaue of a camera setting I have since turned off. But for now, on with the show. It all started when I took a good, long look at the Servant's Staircase.
My first thought? Instant dislike. Oh, it's not that I can't tolerate it; I think I could, but there are some aspects of it I just hate and know I could do better. And I know I won't be satisfied and won't be able to move on to bigger, grander rooms in the dollhouse unless I fix these problems, which are: 
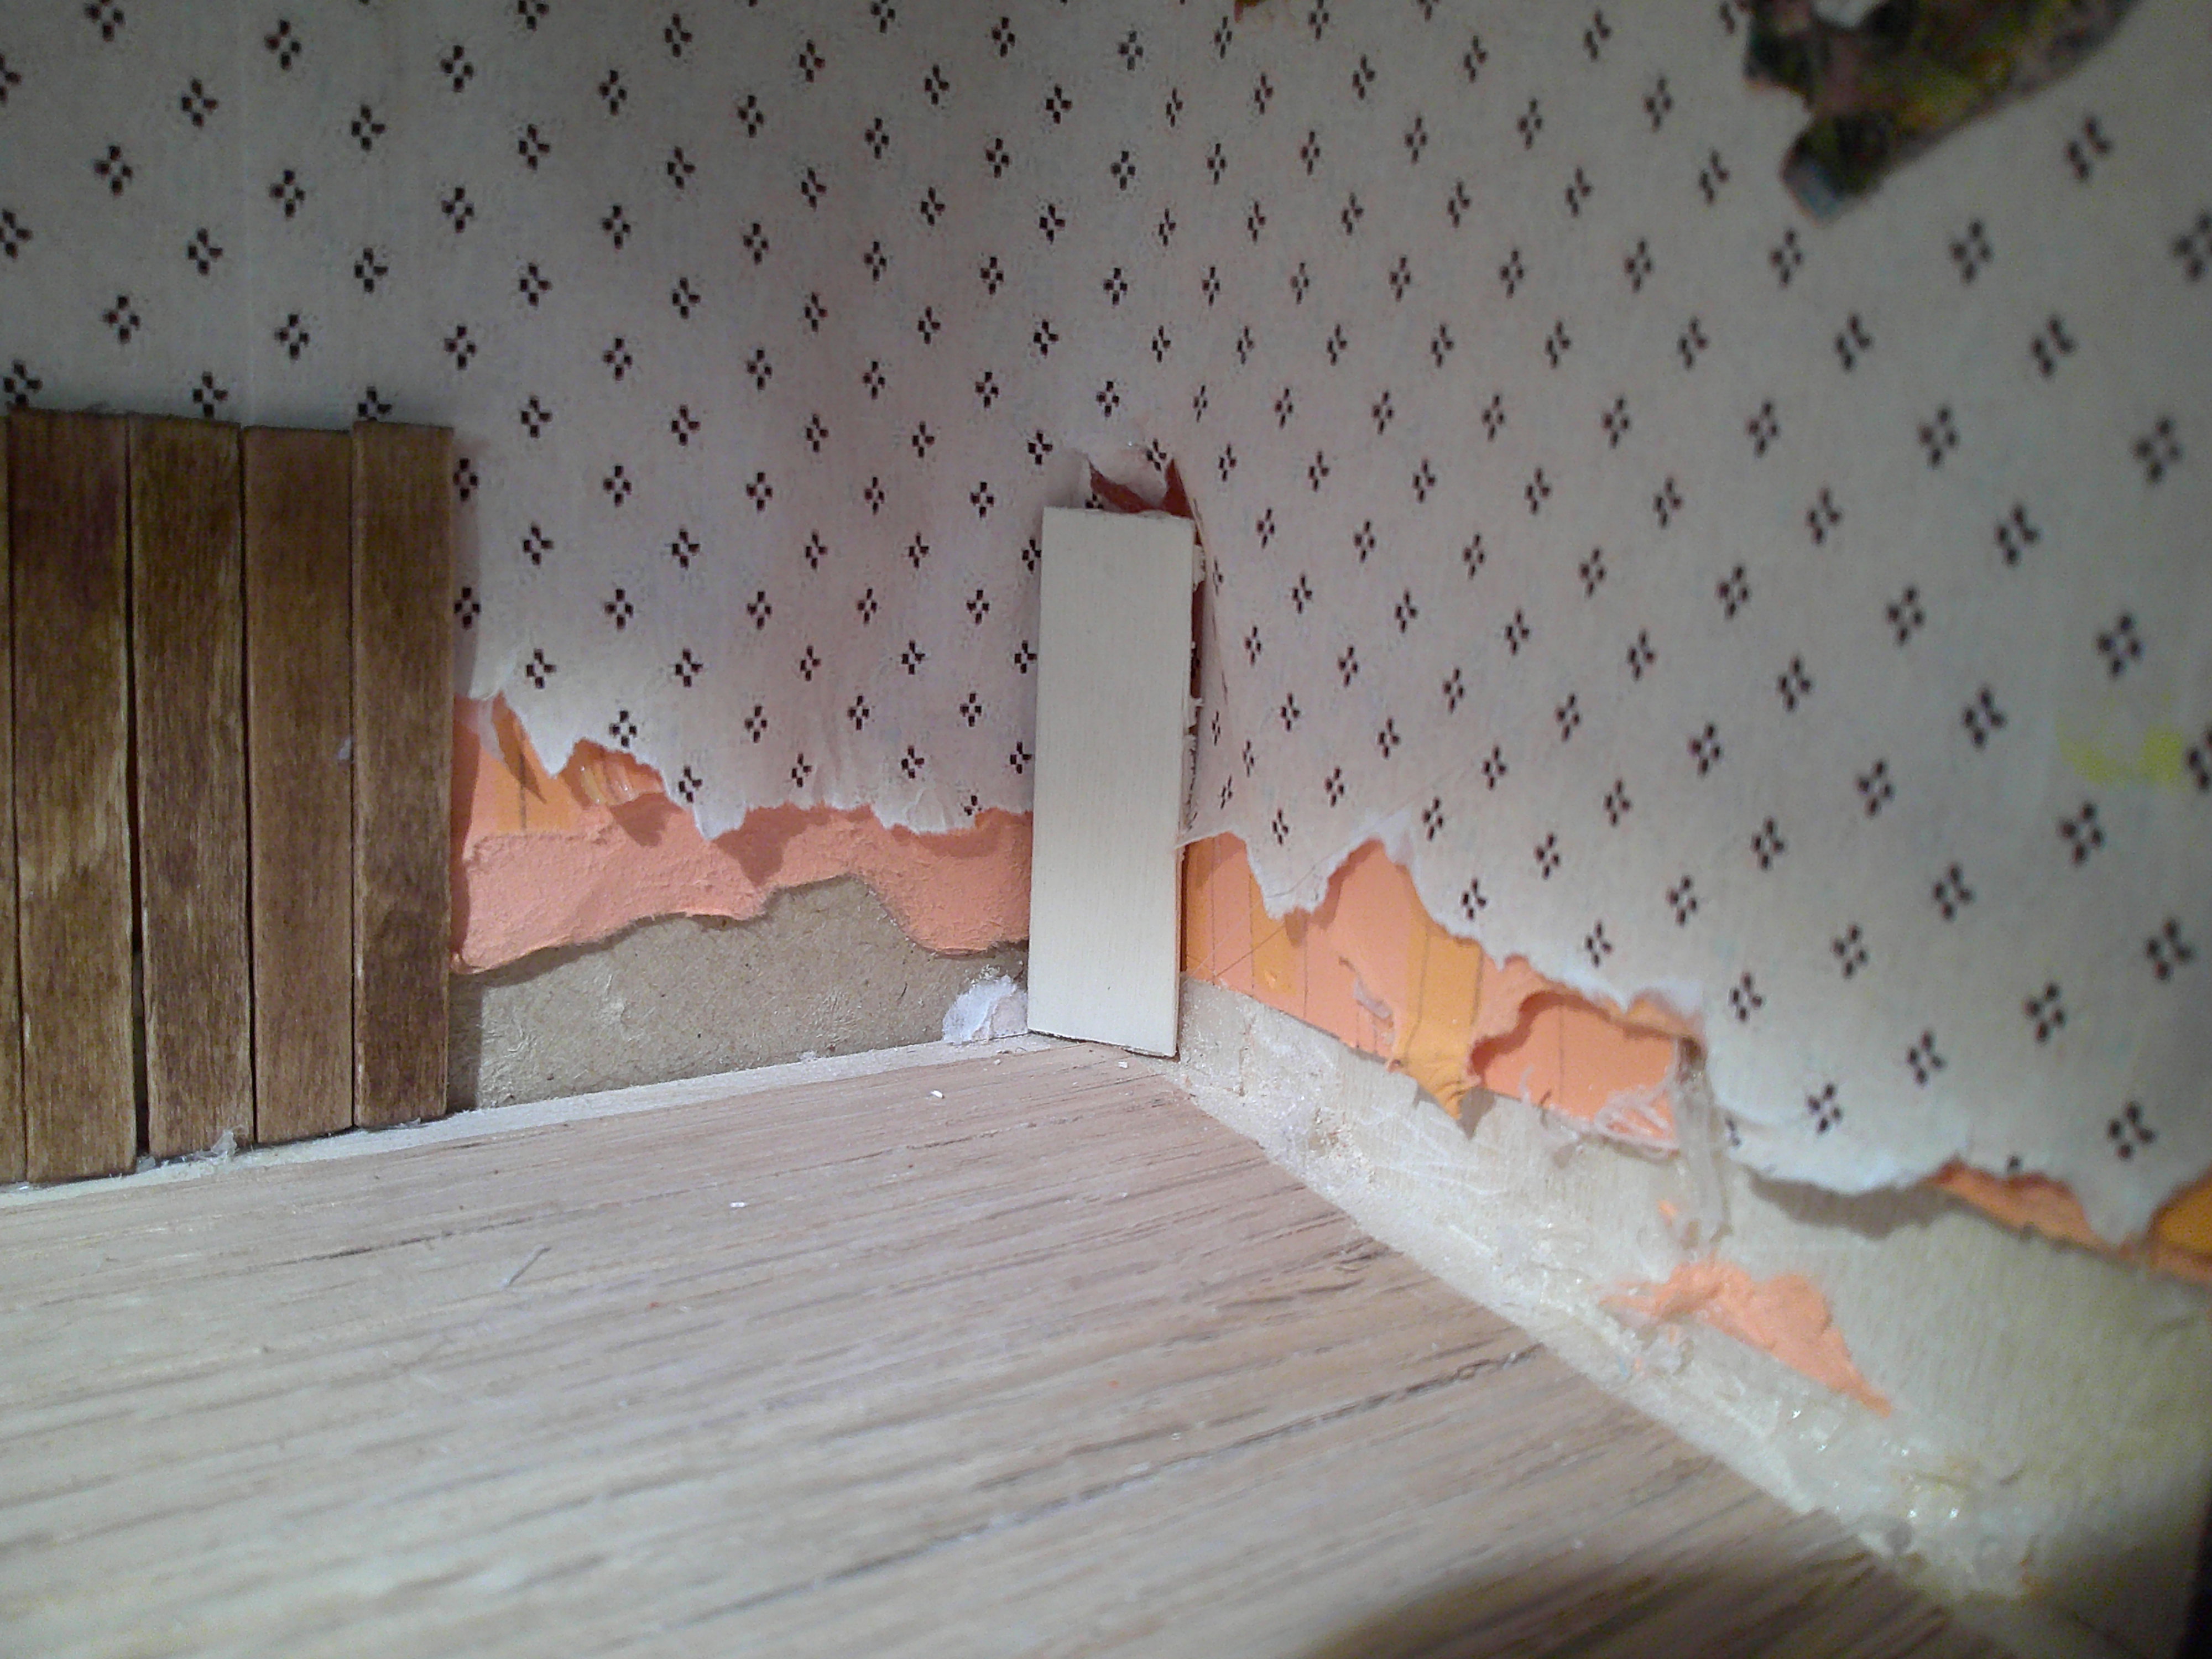
The Skinny, Skinny, Wall
There's no place on earth you'd find a wall this thin except for this servant's entrance and a house made of cards. The Ginormous Step
It may not look that bad in the photo, and I couldn't find my little dolls to compare the step with, but our tiny people are going to have to take a big, big, leap to hop up this step. (Which is probably not the best idea when you're carrying ashes from the fireplaces you've just swept to empty in the rubbish bin outside.) The Ugly Floor
I seriously don't know what I was thinking when I laid this. Well, in all, I don't think I can live with it. Before you freak out, yes, I'm keeping the room (I could never part with the beautiful exterior, but I'm going to redo the interior. Our first step (no pun intended), will be to fix the staircase.
There's the enourmous step with a standard dollhouse-sized riser. I can't get to the ugly staircase without pulling out a wall, so I put that on hold for a minute to work on a brand-new staircase. The first thing was the layout. I think I'll stick with the original staircase layout, but a problem soon arose: I want to inclose it in a wall (like the previous version of the room had), to make it look narrow, but the staircase from the previous version didn't lead anywhere, so the question is: Should this staircase lead nowhere, or shall I cut a doorway for it to lead to? Well, I'm lazy, so I decided to have it lean nowhere. It is, after all, just a roombox. . . And so began the demolition.
I ripped out the false back door and the bells for the servants (never fear, these will be salvaged!), figuring that if I freaked out, I would be able to glue them back without any fuss.
Then I pulled the skinny section of the wall forward, bringing another wall with it, and revealed the rest of the stairs. (I constructed these myself a long time ago, which is why they were so clumsy looking).
I started to rip sections of the staircase apart. . . I wonder what nasty critters are hiding under there? Pint-sized mice?
It was very dark under that staircase!
Here you can really see what I mean about the other staircase being too large: three steps of my new staircase that I constructed out of coffee stirrers equals two steps of the old staircase.
It's even clearer on the higher stairs.
At this point, I freaked out and abandonded the project for about an hour. An hour later of I Love Lucy, I regained my courage and began ripping out the staircase.
After I ripped out the top stairs (which came out very easily 😯), I still had a mess of debris to work with.
From above. I'm not sure if I would trust this staircase any more. . .
I ripped out the top riser. It looks even messier 😨.
And the wall I pulled back. I sure hope nobody wanted to go through that door at that moment!
I was a bit weary of all the hot glue that had been used to hold the landing in place (made from a children's block), so I watched a bit more of I Love Lucy before I continued. Boosting your morale is important, you know! :D
I'm not sure if I'll keep the wallpaper. I like the pattern, but it doesn't photograph well, and servant's halls wouldn't have had wallpaper, which was quite expensive back in the Victorian Times. Not to mention, this is the 1930s, they were more weary about arsenic poisoning, probably!
The whole room. It looks like an earthquake occured! Let's pretend this photo is from the 1920s. On with the restoration!
The state of this landing is definitely against building codes.
Meanwhile, four stories up, in the attic, all of this shaking from the restoration of the servant's stairs had caused quite the gap between the roomboxes.
So I safely moved the Nursery and part of the attic to another wing of the house, away from all of the dust and shaking.
George's Room and another empty roombox were moved to another part of the shelving that houses the dollhouse.
I ripped out the landing, which came out quite easily without any fuss and muss, but it left the trim behind. You can sort of make out an invisible landing there.
Then I met my big adversity. You can't see it well in the image, but it was this wooden block glued very strongly to the ground. No amount of jiggling or shaking would remove it. So, I turned on I Love Lucy (yes, I do Love Lucy), and managed to get it out, using a round-about process. It took me about ten minutes to remember that there was a hole in the wooden block (I think they were for necklace making), so I stuck in one end of a pair of broken scissors, and it popped out! Hurray!(As if on cue, the studio audience on I Love Lucy started to clap!)
Look! No obstructions!
I then ripped out the staircase trim, and with it came some wallpaper.
So far, I have built that much of the staircase. Looking good, if I may say so myself!
Here is the wall color I think I have decided on. There will be stained wainscotting up part of the wall.
Or should I have the staircase in this layout? I'll have to see. . .
The nicely lit hallway above. I wish I had spent my Saturday sitting in it instead of inhaling all of the construction dust! :D Well, that's how my Saturday went by. How about yours?

A Warm Welcome

Originally, I was going to put the back stairs on the left side of the dollhouse. However, after the demolition of the original back stairs ...